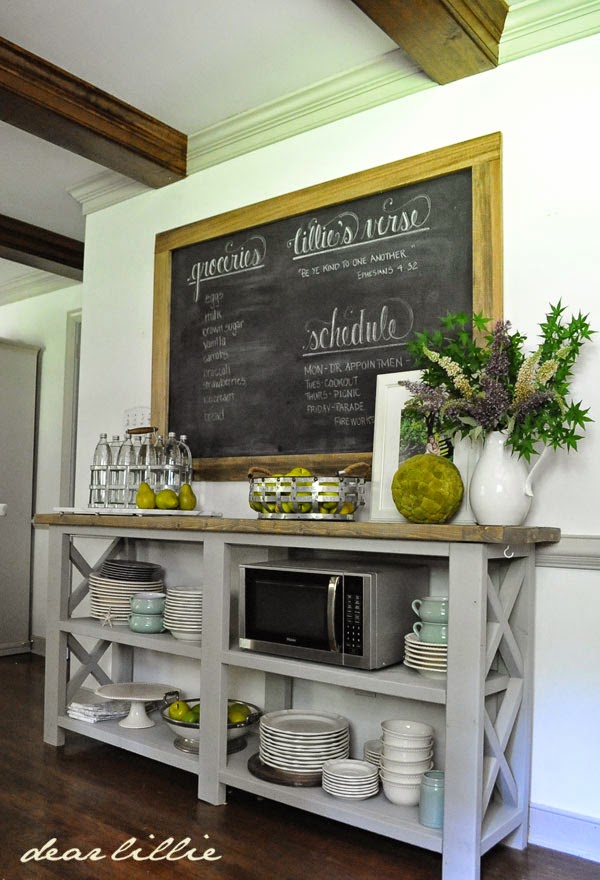
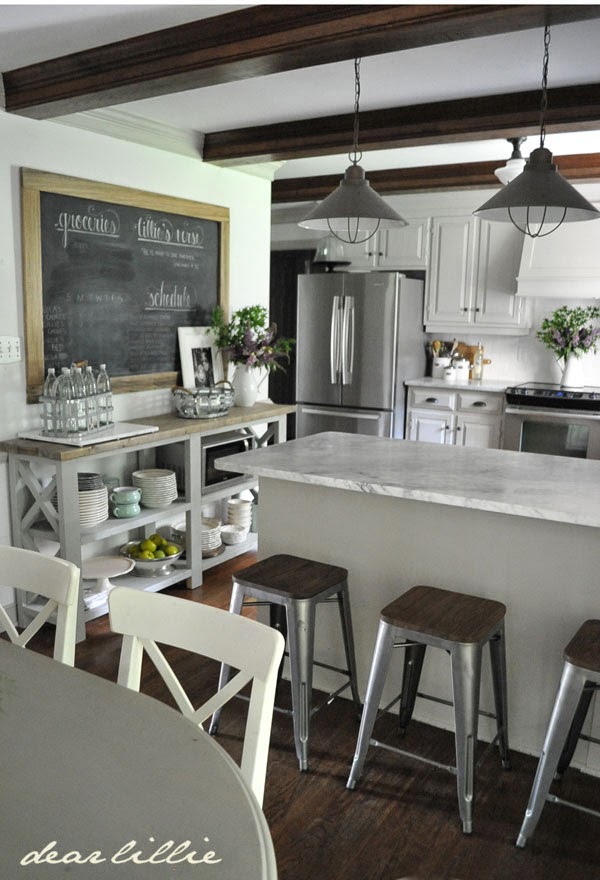
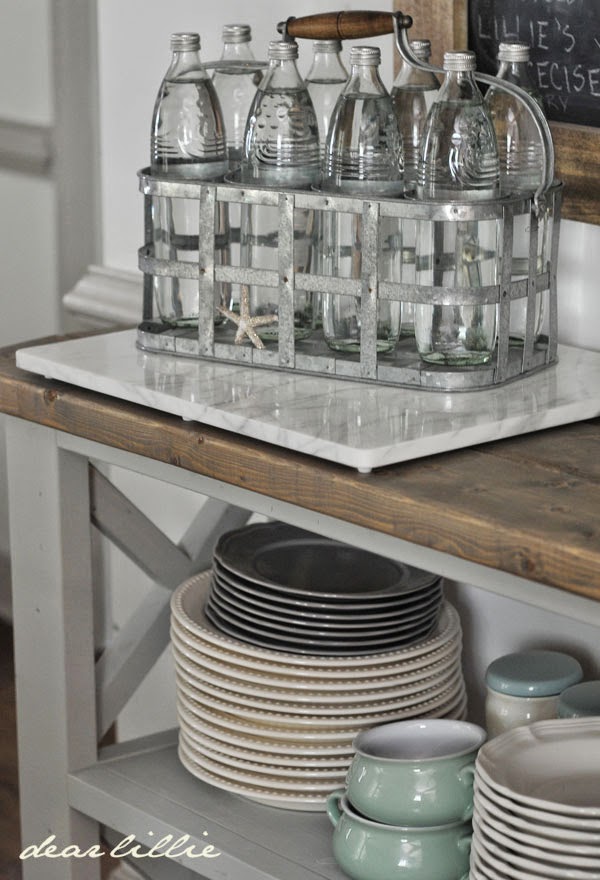
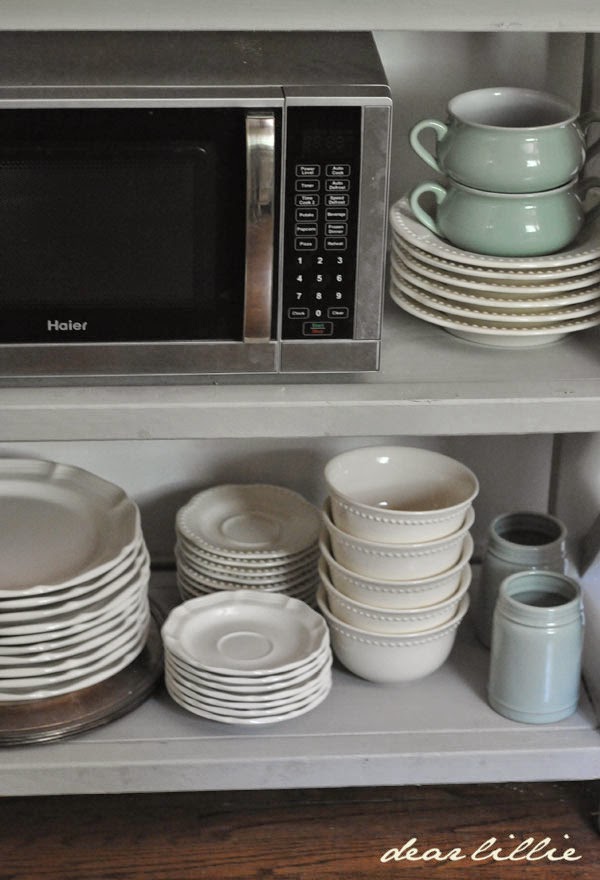
When we did the first part of our kitchen makeover we removed the microwave over the stove and had a hood built. That meant that we needed a new spot for the microwave. I didn’t mind it being on the counter during the first part of our makeover, but once we put in the marble counters I wanted to find a better spot for it. After playing around with a few different options we decided to build a sideboard. We had decided to get rid of the island cart to make the kitchen feel a little bigger and adding the sideboard let me still have a little bit of the open shelving look I liked and also offered a nice little spot for the microwave that wasn’t too glaring and the girls love that they can push the buttons themselves “just like at Mimi and Papa’s”.
Initially I looked around online and in some local stores for a piece that would fit our space but when I didn’t have any luck finding something that was close to the right size and reasonably priced I started looking into some online tutorials on making one myself. I found
this set of plans on
Ana White’s website and thought it would be perfect! I altered it a tiny bit by making it about 4 inches taller (the height on the original design is meant more for a living room console look). Although I have made a few basic pieces of furniture before (like our dining room table and bench as well as lots of frames) I really don’t know what I am doing so was a little bit nervous to attempt this. The plans were quite detailed though and there are links to other bloggers (and I also googled Ana White X Console and found quite a few more) who include lots of details as well so I figured it couldn’t hurt to try.
Although it is by no means perfect (seriously – don’t look too closely – haha!), I have to say I am so happy with how it turned out. It feels incredibly sturdy and really was surprisingly easy to make. And it’s something you can make completely on your own. It certainly would make it faster and a little bit easier if you have someone helping you, but seeing how I don’t let my little helpers use power tools just yet =), I did this one on my own.
Seeing how
Ana White has the plans on her site there’s no need for me to repeat it here but I will show a few of the photos I took as we made it.
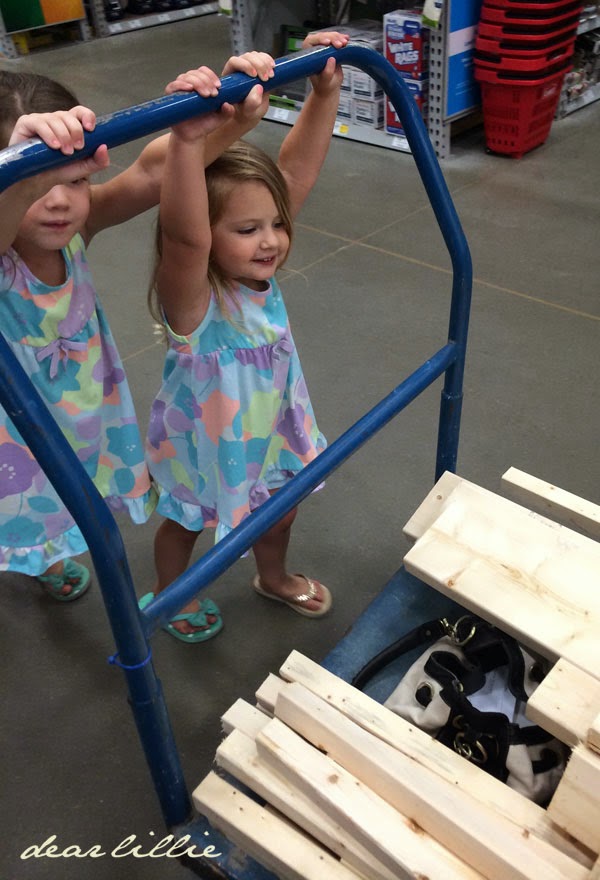
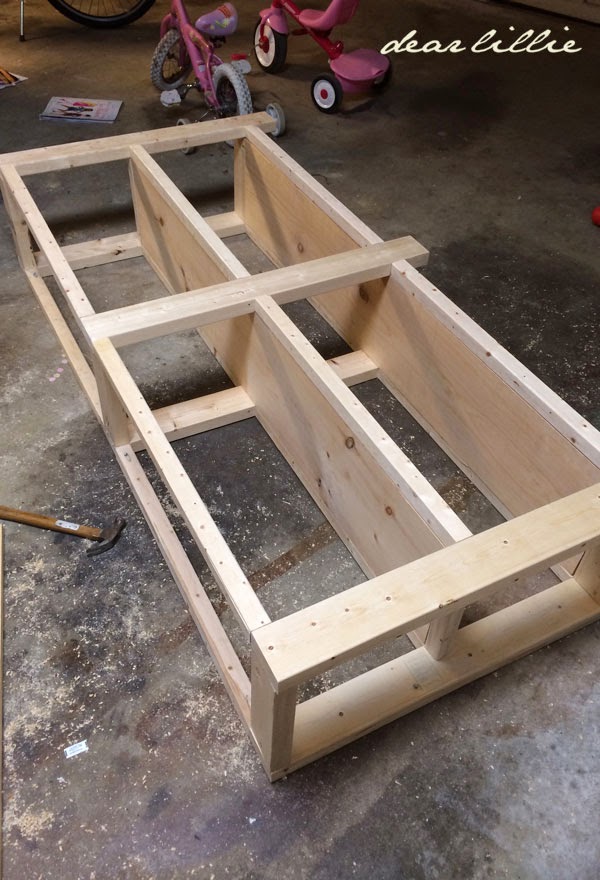
First, we took FOUR trips to the Lowe’s and Ace Hardware in about 24 hours for this – ugh! Make sure you have EVERYTHING you need before you start – haha! I had them cut quite a bit of my wood at Lowe’s but I also cut quite a bit at home too.
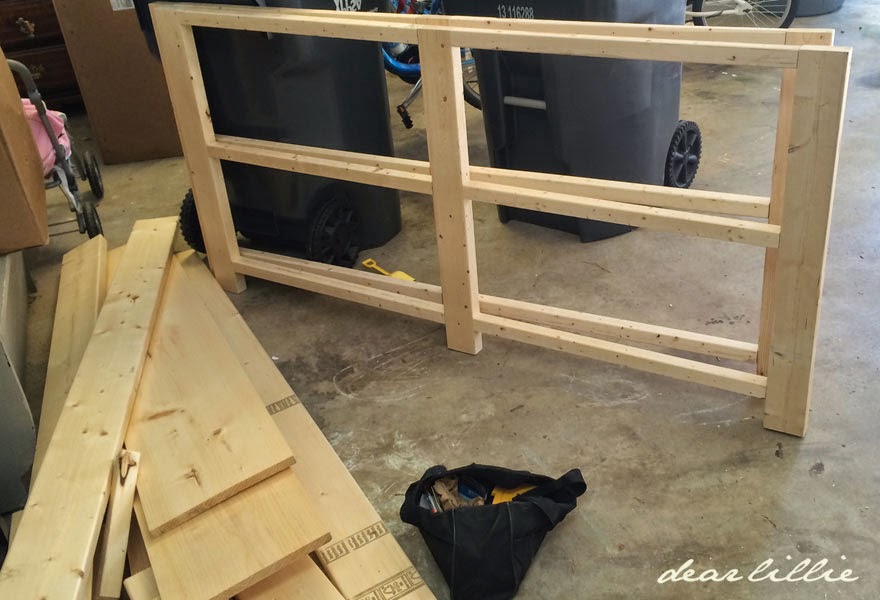
Then you build the front and back:
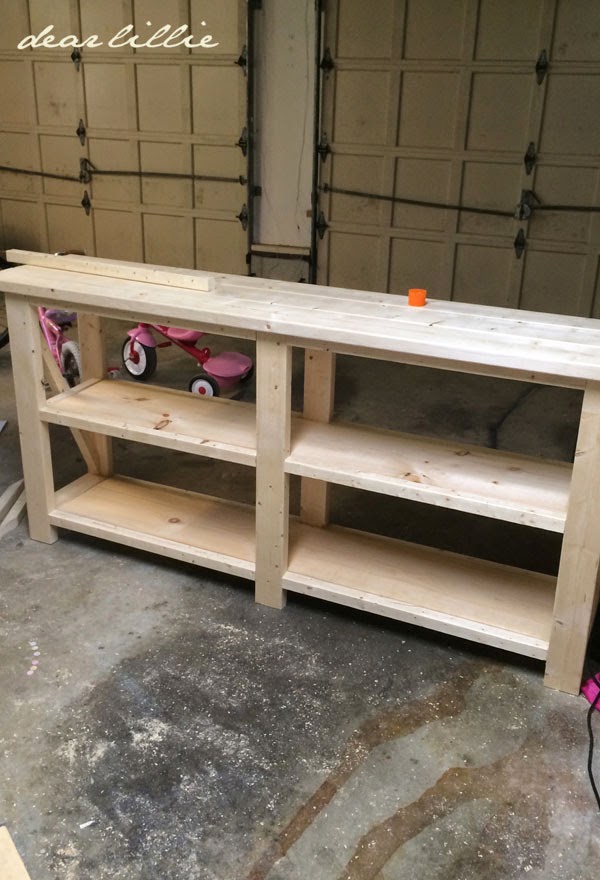
And then you fill in the middle:
and add the top:
Once I did that I stained the top using one coat of a graywash stain and another coat of Provincial. I didn’t want to stain the entire piece because I thought that might be a little too much with the chalkboard above it. I wasn’t sure what color I wanted to paint it though, either, so I left it in the kitchen like this for a day or two and thought about it.
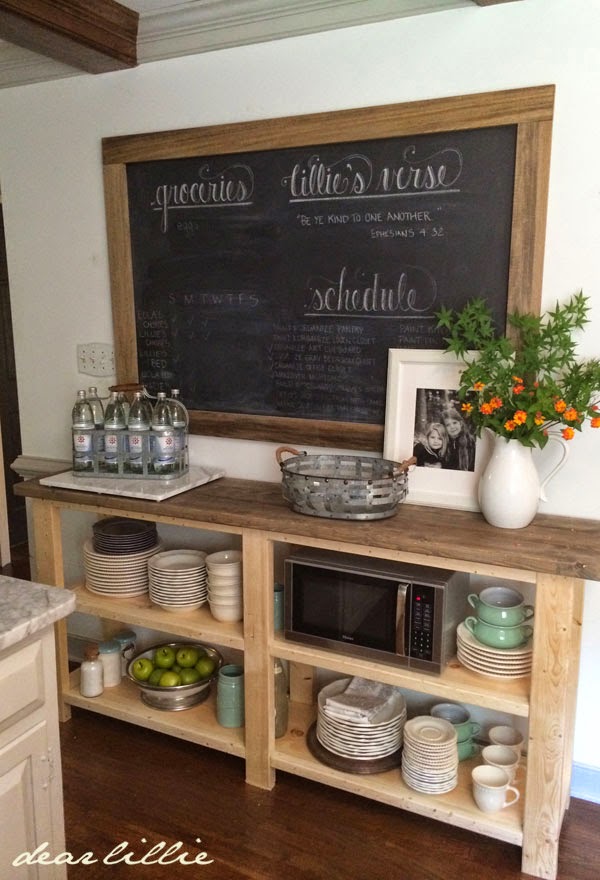
I ended up just painting it Sea Haze by Benjamin Moore seeing how I still had some of that left over from the nightstands. In real life it has a nice bluish green undertone to it. I didn’t do a very good job photographing it though because I think it looks quite a bit more washed out in a lot of these pictures.
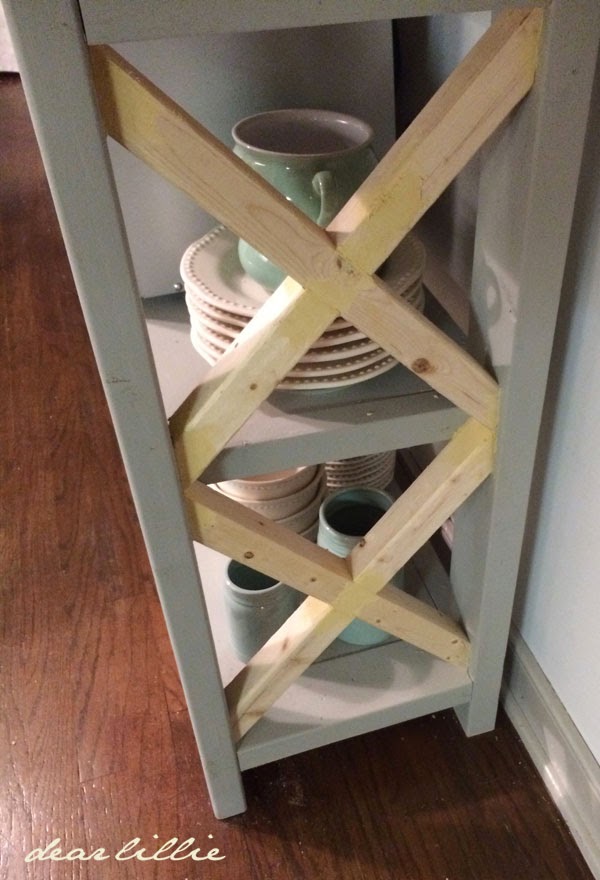
Once I painted it I started working on the x’s. Because I made mine a little bit taller than the one on Ana White’s site the single x measurements didn’t work right so I had to make my own. I could not for the life of me get the single x to look right though on mine so eventually I threw in the towel and just did two smaller x’s. Once I had them secured I used lots of wood filler to smooth out the spots where the x’s connected. And then sanded them down and painted them to match the rest of the piece.
And there you have it!
I’ll share lots more photos of it where you can see the whole kitchen tomorrow. I hope you all have a wonderful Tuesday!


Your new piece is fantastic! It's very good looking and useful.
I like it a lot! I like it without the paint, too, but that's a different look for your kitchen. We are finishing our kitchen reno (Ikea) and your photos have inspired me a lot.
It looks fantastic! Love the color you chose as well.
This piece is great looking and how special because you made it for your home! You have lots of storage space and I like the microwave there. Enjoy your day, Cindy
Looks pretty perfect to me… form follows function …Thank you for sharing … This piece has given me the ideal inspiration for my breakfast nook…
Oh and by the way… I love that the girls split thier flip flops…such a sweet sisterly thing to do!!!
Beautiful job, and such a lovely home! Your girls have a great teacher–can't wait to see the projects they come up with in the future!! 😉 I'm in love with this sideboard, as well as many of Ana White's other plans for benches, tables and other furniture.
This looks so great! I wanted something exactly like this for my back patio. Now that you provided instructions, I will have to put it on my Husband's "to do" list. I am sure he will be thrilled. 🙂
Erica
http://www.thedecorina.com
Looks amazing. I love this idea, so much great storage.
It looks beautiful! A wonderful addition to your lovely kitchen! Ana white website is awesome! We are going to make her farmhouse table soon! Blessings!
So happy you decided to build it yourself! Everything you do is beautiful, it looks amazing and now your girls will know they can do it too one day, and not everything needs to be bought. How much did it end up costing? And how long did it take?
Thanks! I think I spent about $80 on my first trip to Lowe's and then probably another $20 on my remaining trips (I'm not 100% positive though). I worked on it over the course of several days an hour or two at a time, but I would definitely say it could be done in a day though.
This amazing $100 and a days worth of work. A piece like this would cost $1500 at Ethan Allen.
First I have to say it's so sweet how the girls shared their flip flops…those girls are too cute! Thank you for sharing this, it's exactly what I need for my living room and I would never think I would be able to make it, but you have convinced me to give it a try, if it doesn't turn out it will be great storage in the basement or garage. Thanks for sharing. Jeni
I love the combination of gray and stain. Looks great in your kitchen!
Looks great, can't believe you built it all by yourself! I really need to try and build something soon, you are an inspiration!
You did a great job and it looks not only functional but attractive. I really need to attempt making one for our kitchen. Thanks for the inspiration.
Love this!! I am going to try to make one too. Such a great addition to your kitchen!! Emily
It turned out awesome! Love, love. I wish we had done a hood instead of the micro over the stove. I like the idea of the kids being able to use it without a stool.
Great job Jenni – you are inspiring people to give big projects like this a try!! That console turned out absolutely fantastic – love the double "x" pattern!!!
Just be careful about Barbie wanting to try out the new "sauna" – hahaha!!
Leah: )
Jennifer, this piece is awesome! You are so talented! Love it!
I love it! The two x's look perfect so I think no worries on not being able to sort out one big one. 🙂
xo, Shannon
It looks amazing!
Bravo!
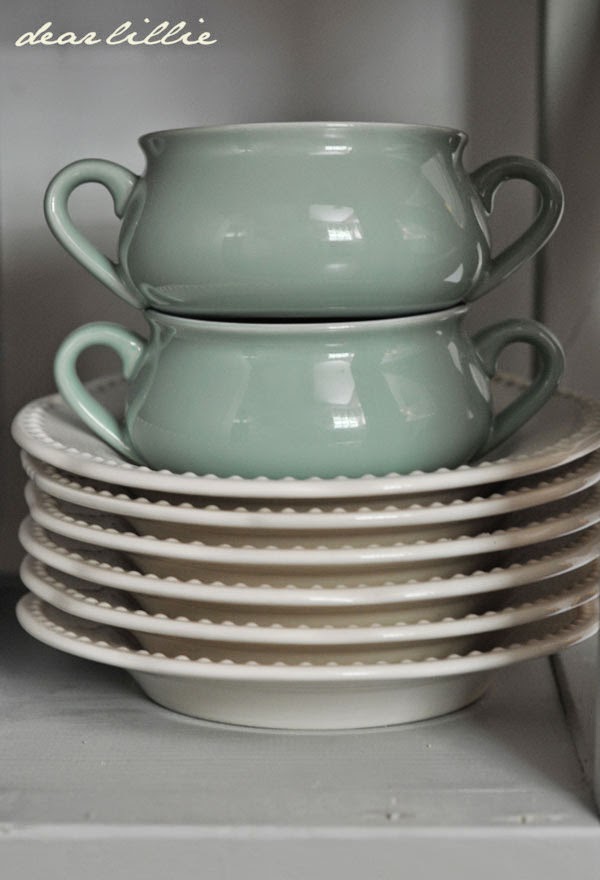
The sideboard looks great and must be a wonderful addition to your kitchen. Would you share the source for those incredible grey green blue soup bowls. I am in love!
Thanks! They are from World Market!
Great job. It is adorable.
Just ran across your blog today. The sideboard looks great! Love the soup bowls!!! I'll be checking out World Market for sure.
Btw: the girls are sooo cute. Love that they swapped one flip flop!
Looks fantastic! Ana and I designed the original version together, but I love your double X version! And the colors are fantastic. Nice work!
What's the name of the stain used?
I used Provincial and Classic Gray by Minwax!
this is fantastic! can you share your dimensions? i need a taller sideboard for our space as well. thank you!
Thanks, Kristen! We used the same dimensions from the Anna White site, but we made it 4" taller!
Hi! I love the sideboard and my kitchen layout is very much like yours and my microwave sits on the counter and have hated it for years. So, I am going to try to make this. When you say you used two stains…did you mix them together or put one on at a time?
Hi Again! I was wondering if you could also tell me which Kreg kit you use…$150 set or $99 set or something else? Thanks!
Another question…since you made yours 4" taller, how did you adjust the height between the shelves and the bottom shelf height from the floor? Did you leave them at 10 1/2" and have more at the bottom or did you adjust differently? Thanks…again!
Hi Jennifer! I know that you said that you did not adjust anything to the shelf height or the distance from the bottom of the lower shelf to the floor. However, I am confused. From looking at your finished sideboard it looks like yours is the same distance from the floor as the Ana White one but you said you added 4 inches to the height through the legs. That would seem to mean that there would be about 7 inches of height from the bottom shelf to the floor which that is not how yours looks. So, can you tell me the height from the top to the middle shelf, the height from the middle shelf to the bottom shelf and the height from the bottom shelf to the floor so that I can try to figure this out. Since I will be using it in my kitchen as well and have the same chair rail, I will need to adjust my height as well and I don't want to start and then realize I did something wrong if possible. It's hard to tell in the pics of yours but I am thinking that maybe the the first shelf height is bigger than the bottom shelf, but again not sure. Thanks so much for your help on this!!!
It kind of just dawned on me that maybe you just spread the 4 inches out evenly between the two shelves by adding 2 more inches to each shelf height, but I'm not sure. Is this right?
Sorry for the confusion! We didn't add the length from the legs–we just adjusted the distance between the shelves.
Love your sideboard but I was wondering where you got the big chalkboard above it. I have been looking for one lately. Thanks!
Thanks! We made the giant chalkboard! You can read more about that here: http://dearlillieblog.blogspot.com/2013/10/an-oversized-chalkboard-and-bench-in.html
Hi. I just discovered your blog and love your new kitchen. It is so beautiful. This is sort of a strange question…the sideboard is gorgeous and I love the way you have styled it, but do you really keep all your dishes there? I really struggle with styling and find I keep buying useless stuff just to fill up a space. What do you keep in all the cabinets if the dishes are all out on the sideboard?
Thanks! We keep our drinking glasses, mugs, pots and pans, other dishes, baking items there and even some "arts and crafts" in the drawers.
Hi! I am absolutely in love with your kitchen! I am going to try this project this weekend and was hoping to get your advice. What kind of wood did you use on this project? Also, can I get a little more detail regarding your staining process? How did you stain the top? I did see that you used provincial and classic gray, but I was wondering which color you did first? And did you do a full coat of each color or just a dry brush of one of the colors? Thanks so much for your help!
Thanks, Brittany! I can't remember exactly what the wood was, but I would imagine pine. I just wiped on one coat of provincial and then wiped it and then wiped on one coat of the gray while it was still wet.
Can you share the dimensions for the two smaller X's? Using the plans but making it 4 inches taller like yours and love the double X design!
Hi! Can you please share the dimensions for the double x's? Thank you! 🙂