Today I am going to show you how I made this rustic chalkboard for our dining room. I actually had it figured out in my head this summer and had planned on making this same frame for my parents when I was up in NH in early October. I even went and bought the wood. We ended up working on some other projects though and didn’t end up doing this one, although we do have all the supplies so I will be able to at some point. Once the idea was in my head, I really wanted to make it so when we got back here I thought I would go ahead and make one for our house (because we really needed another chalkboard…)

Here is what you need for this project:
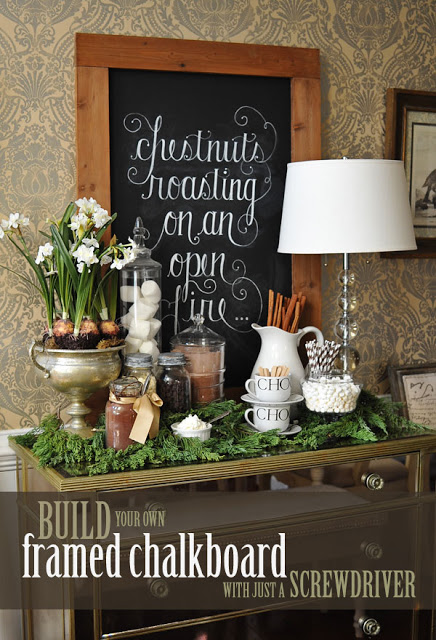
4 pieces of wood for the frame ( I used two 29″ long and two 35″ long – the total frame size when finished is 29″ by 42″)
1 large piece of wood (mine was 24 inches feet by 38 inches)
chalkboard paint
stain (or paint) for frame
screwdriver
mending braces (I used 2″ by 1/2″ ones)
screws ( 8 by 3/4)
* If you are making this frame to use with our chalkboard downloads I would recommend using boards that are 28″ and 33″ and the large piece of wood should be 24″ by 36″. Those are the measurements I used on the frame in the product photos!
So here are my boards. I had them cut to size at Lowe’s. I used 1 by 4’s (which are actually about 3/4″ by 3 1/2″). Make sure your board that is going to be for the chalkboard is slightly larger than the size of your frame opening.

The first thing I did was paint my board with my chalkboard paint. The more coats the better! I went with a cheap board so it was a little rough but that doesn’t bother me. If it will bother you you could probably sand your board down a bit first.

While your paint is drying you can put your frame together. Here are the braces I used.

Just put the four pieces together and use the braces at each corner. I just used one on each corner (for a total of four) because I was doing it quickly. It was sturdier than I expected but if you wanted it to be extra secure I would recommend doing two braces on each corner for a total of eight.

Now I flipped it over and started staining. I used some tea and then a vinegar with steel wool mix. I loved how it looked on the board I was practicing on, but not as much on the actual frame. I am going to play around with it some more before I share any more about that. You can use any stain you would like or even paint your frame.

So here is how it looks at this point:

Now it’s time to attach the chalkboard. These are the screws I had on hand. There is probably something better you could use but they were the right size and they worked fine.

I just screwed them chalkboard onto the back of the frame. If you have a drill it will make it a little quicker but it’s still pretty easy with just a good ol’ screwdriver!

I think I spaced them out every six to eight inches or so:

Here is how it looks from them back when you are done. I just leaned mine up on my mirrored dresser but if you wanted to hang it you could always attach something so it could be hung!

And there you have it!


And if you want to see more photos and details of our hot cocoa bar click here.
And here is a photo of the frame painted:


You can see more photos of this baby shower here.
Have a wonderful Tuesday!


This is a great tutorial. I'm not much of a crafter but I think this is something that I could certainly handle and we would use for a while. thanks for the easy instructions.
Hi Jennifer, thank you for sharing this tutorial. I have a chalkboard with a broken frame and I always put it out of my sight. Now, there is no excuse to make a new frame, according to your instructions it is a piece of cake. We desperately need a chalkboard. Have a nice time. Renata
I love your blog and the chalkboard! I wish my handwriting was as pretty as yours. What kind of chalk pen do you use?
Thanks, Jackie! I use whatever chalk pen I can find. =) I've used ones I've ordered off of Etsy, of Amazon, and ones found at a store called Twin Elm Farm in Peterborough, NH as well as ones I've found in JoAnn's! I don't like the JoAnn's brand as much as the other ones.
Hi Jennifer. I love your chalkboard and especially the mirrored chest. I know from a previous blog entry that you purchased it at Haynes Furniture in Virginia….do you happen to remember the brand? I'm trying to find it online as I live up in NY. Thanks so much!!
I don't Eileen. Sorry! =( I am out of town so I can't check to see if there are any markings on it. I will try to look when I get back. I think I looked for someone else though and don't think I found any hints of who it was made by.
I'm in total awe of your chalkboard art!!!
Now can you teach us how to do the fabulous writing? Please, and pretty please.
Thank you so much for the tutorial. I want to make one some time in 2013. Yours is so beautifu!!
Love the chalkboard!! What color stain did you use?
Have a wonderful weekend and a blessed Christmas!
Warmly,
Jenni
http://www.dearlillie.com
http://www.dearlillieblog.blogspot.com
Thanks Jenni – I can't wait to make one!
xo Leah: )
I have a Martha Stewart lace chalkboard in my dining room blank just waiting for the how to on writing like that?
Love, love, LOVE it!! This definitely seems like something I could do by myself! 🙂 Thanks so much for sharing! Now, I MUST know your secret to getting your PERFECT writing on the board. Please, pretty please?! 🙂
Thank you! =) The writing is just my regular cursive with a few added swirls and then I thicken some of the lines up a a bit to look like calligraphy.
WOW, you had me at "just a screwdriver"!! love it. what color stain did you end up using?
Thanks! I used a vinegar and steel wool mix! It didn't age as well on that frame as it did on the practice boards I tried on, though. =(
Ok. Now I just need to figure out how to write as beautifully as you! I love simple projects like this that a person like me can even do.
Looks great, thanks for the easy instructions!
I`m completely in love with that cocoa bar!!! I want one now!
Kely Pinheiro (www.blogbellafiore.com)
Jennifer you are so sweet to share this tutorial. I really loved the chalkboard when you first posted it. Now that I know it's an easy build I may give it a try.
Like so many others have said now all I need to do is write as beautifully as you do. : )
The chalkboard is stunning…your script is incredibly beautiful!!!
I gave it a try and it turned out amazing! The only change I made was that I added a magnetic coat of paint underneath the chalkboard paint!! Worked perfect! Thanks for sharing!
That' s a great idea!
I made one and the chalk pen will not wipe off…how did you get yours to?
Sometimes they wipe off okay and sometimes I have to paint over them.
I'm having the same problem. Do different chalk marker or chalk paint make a difference?
It helps if you season your board first and also I think how porous your surface is matters somewhat too.
What kind of wood did you use for the chalkboard piece?
Honestly it's been so many months I don't remember. Probably just whatever was cheapest at Lowe's.
I just made this…it turned out os much better than I thought it would! Thanks for posting this tutorial.
Love the frames and am planning on making one for my family room. Could you share the paint color on the frames that are a shade of white? They look wonderful. Thank you so much for sharing the tutorial.
Thanks! They are really fun and easy to make. I don't recall any white ones. Maybe the gray one looks white on your monitor? That one was Ashley Gray if I remember correctly.
This is my project for the week! I've got my frame ready. But did you use fiberboard or plywood for the chalkboard part? Thanks!
I used plywood on the first one I made. I've made several and pretty much just use whatever I have for leftover scraps. I would think fiberboard would work fine too!
Where can I find the chalkboard downloads? I know they must be right in front of me, but I just can't find them. Thanks! Gale godwin53@aol.com
You can find all of our chalkboard downloads here:
http://www.dearlillie.com/category/chalkboard-downloads
Have a blessed week!
Warmly,
Jenni
Jenni how do you make it look like a "chalkboard" when you are only using paint pens? When you are finished do you write on it with chalk and wipe it down? I have only just painted my boards, but they seem so glossy.
I often lightly sketch out the general placement of where I am going to draw my words first with regular chalk and then just wipe it off with a dry cloth and that leaves a nice chalky residue that helps it like a "chalkboard".
Could we please ask whether you condition your board first once built? We also rolled our chalkboard paint, but reviews we have read say b/c the cb paint is water based/latex not to wipe it clean with a damp rag- so our board 'conditioned' still has an all over grey'ish color rather than looking like a blk board (or as it looked when the cb paint was just rolled on). I know this question seems silly, but didn't want to use the wet and end up having the chalkboard paint wear away. Do you condition yours each time after writing something, that just seems like a lot of work? Your tutorial was great, thank you! We made ours slightly different so our girls could use in their playroom.
I do try to condition it right after I first make a new chalkboard before using it but after that I generally don't have to again for a long time if I just stick to using regular chalk. Maybe I use a different kind of paint (or maybe I just never read the directions properly) but I definitely use a damp rag once in a while to properly clean the board (although I generally just use a dry one for our day to day chalkboard in our kitchen because we change it up so often).
Thank you!
Hi, how do you attach the chalkboard downloads to your framed board? I'm making the size that you recommend to use the 24×36 printables, but hubby is afraid you'll be able to tell it's paper over the board…
Hi! This post shows more detail: http://www.dearlillieblog.blogspot.com/2013/02/how-to-download-print-and-frame.html
great