We had a lot of people ask how we made the ottoman slipcover in our post a few weeks ago. I figured seeing how it is an inexpensive way to spruce up an old ottoman or a great project to do if you can find an cheap one at a thrift store to start with as your base I would try to take step by step photos when I made the second one. I really don’t feel comfortable calling this a tutorial, though, because when it comes to sewing I have no idea what I am doing and tend to just make it up as I go along, and all of you out there reading this that actually know how to sew will absolutely cringe at how I do each step. I will feel much better doing a tutorial when it is something that I am at least somewhat educated in. I studied Interior Design and Fine Art in college to start with and then ended up getting my degree in Graphic Design, so although I am by no means an expert in any of those fields I at least feel like I have some vague idea of what I am doing. Sewing, on the other hand, not so much! So, although this is not a tutorial I will try to show you step by step as best I can how Lillie and I muddled our way through making our second slipcover for our ottoman. If you are wondering why we bothered to make a second one, it is because knowing that I will often be changing the new baby on it I figured that poor first slipcover will be in the washing machine all of the time and it will be nice to have a backup to throw on there when it is!
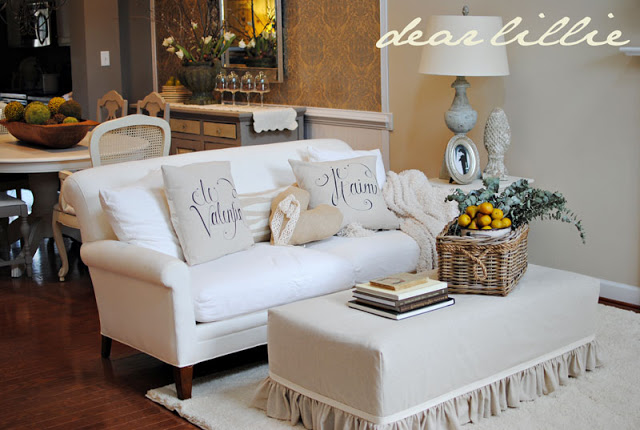
Here is the finished slipcover:
So, here goes!
1) We laid our fabric over the ottoman with the WRONG SIDE UP (that is very important as you want to make sure you do the sewing inside out!) and then trimmed it so it was even around all four sides. This does NOT need to be even close to perfect because it will be covered. Because we were going to make a little skirt we didn’t need it to hit the ground. I think it was about four and a half inches or so off the ground.
2) Next we pinned all four corners.
As you can see here my helper was adding them in places they weren’t needed.
3) Once we pinned the corners we cut off the excess corner fabric.
Still leave at least and inch or two for now.
Once you have sewn them you can cut off another 3/4 of an inch or so.
4) Next we slid it off the ottoman and headed over to the sewing machine. Using a basic straight stitch we just stitched up each corner where we had the pins.
(Not shown): then we just cut about a quarter inch away from the seam so there wouldn’t be any excess fabric wadded up under there when we flipped it back right side out. The picture below shows it before we trimmed it down.
5) Then we flipped it back so the right side was on top and slid it over the ottoman.
Clearly we didn’t take any time to iron it yet – haha!
6) (Not Shown)Then we measured the end of the fabric on the ottoman to the floor.
Ours was somewhere around four and a half inches.
7) We then started cutting strips that were as long as we could get out of each piece and six inches wide. You probably want to measure your ottoman the whole way around (ours is approximately two feet by four feet so it was about twelve feet around) and you need approximately double that to make your ruffle.
8) Because we didn’t have a piece of fabric that was 24 feet long I just cut lots of strips that were six inches wide. You can see the pile below. I didn’t think to do this until mid-way through but if you sew all of the strips together you can get one really long one that will make pinning it onto the ottoman a little easier.
9) Then we folded up the bottom and hemmed it.
10) Now for making the fabric “ruffle”. Here is what I set my sewing machine to:
11) Then we just put the fabric under the needle and sewed and sewed and the machine just “ruffles” it for you. Doing twenty-four feet of it though can get a little boring. It actually goes pretty quickly though. Here is what ours looked like when we were done:
12) Next we pinned the ruffle onto the main part of our slipcover while it was still on the ottoman that way we could make sure it fell the right length. Ahhhh – and what a surprise – we don’t have quite enough. I think I first only cut around twenty feet or so because I was running low on fabric but I went back and cut a few more strips and think it ended up being closer to twenty four in the end.
Ahhh – now we have enough!
13) (Not shown) Then we pulled it off the ottoman once again and just using a simple straight stitch with our settings back to normal (don’t forget to change them back before you start this part) sewed the ruffle right onto the main part of the slipcover.
My cute little helper got a little bored at this point and decided she just wanted to “rest” on the ottoman while I sewed (which made the sewing go MUCH quicker so I didn’t complain!)
14) (Not shown) And last but not least once it was back on the ottoman I just glue gunned the trim on to cover up my seams where the main part of the slipcover meets the ruffle. Now I am sure that any of you out there that know how to sew would probably die at the thought of doing that! Sorry! It was just so nice and easy! I waited and did that after Lillie was in bed because that seemed a bit too dangerous for her. I wanted to go with a completely different style trim in a darker color than what I used but of course our fabric store had NOTHING to choose from and I didn’t feel like waiting until I could find something better so I just went with what they had.
And there you have it!
It actually was really really easy and I think took about 3 or 4 hours start to finish although we broke it up and did it on two different days (and that was with little hands helping…I think it would be even quicker without a two year old as your sidekick). After rereading my instructions I am reminded how horrible I am at explaining things – sorry!
And here is Miss Lillie trying it out:
She has started picking out her own clothes lately. She did a great job on this day. It was so cute. She picked out a pair of her
Joyfolie shoes Jessica sent us last summer and her dress and then when I put the red sweater on to match her shoes she informed me she needed her “Red Dana Hat”. I was feeling quite proud of her….how silly of me – you should have seen what she picked out to wear today! She put on TWO skirts – yes two! One teal blue one and then over that she put on a pink and orange one and then a pair of navy leggings and a shirt from last summer that had about fifteen different colors on it. Needless to say I at least made her take off the top skirt when we left the house! Oh well!
Anyway, back to the ottoman!
Here is what we had to start with that we hadn’t used in over a year and a half
because it didn’t go in this room at all!
And here are the slipcovers:
I still like this that one we made a couple of weeks ago better. The fabric is nicer and I like the more boxy look of the pleats (although they were a pain to make!) so I will probably keep this one on most of the time and just use the other one when this is in the wash.
Another change in this room is the mirror. I got it with some birthday money and I am so excited about it! I have a project I want to do on the mantel for valentine’s day but still haven’t gotten to it – arghhh! Maybe this weekend!
Well, that’s it for now. I am off to bed and Jon is waking up – yes, we have very odd schedules. I am looking forward to April and May when our life gets a little more normal….oh wait! We have a new baby coming then so I guess it will probably be even crazier! Haha!
I hope you all have a fabulous weekend!
P.S. I am linked up to Miss Mustard Seed’s Copy Me Challenge, Funky Junk Interiors and to Wendy’s Frugal Friday , you should check out all of the cool projects!


Thats fabulous, and your tutorial is very understandable… I am now planning for something like this on my little low hight an old round table… Thanks for sharing your idea …
Hope you would like to spare a little bit of your time for me sure you will enjoy
http://craftaworld.blogspot.com/
Love
Farah
ty for such a easy tutorial to understand. i have a old red leather ottoman i would love to cover but with a black cat seems like it would be in the wash more then on ottoman but i may attempt this anyways….i haven't sewed for yrs and finally got a sewing mach for xmas and will mark this for 1 of my projects…………….your Lillie is just way to cute i enjoy her pictures so much!!
Simply gorgeous!! I love how it turned out. Lillie is such a little fashionista in the making! Have a great weekend!
Thank you for sharing your tutorial! I love how your ottoman turned out! The ruffle trim is perfect! Lillie is so adorable! I miss when my daughter was her age.
Your home is just gorgeous…. gotta love slipcovers….
Pattie
Hi Jenni! This is a great tutorial, you're a natural. The slipcover is so pretty. I may just give this a try myself because your instructions are so easy to follow. :o) Lillie is so cute! I love when the little ones start dressing themselves…my boys used to go out as all kinds of characters because whatever they chose to wear typically came out of the dress-up box!! My oldest was usually a knight and the younger one was always "Dash" from the Incredibles. Good memories! xo
You did such a beautiful job on the ottoman. You could give me 10 tutorials and mine would not look like that! You have a gift and also an extraordinarily cute daughter!! She always looks so darling!
Jennifer, I love both slips. Great tutorial and maybe I will attempt to make one some day.
Absolutely gorgeous…both of them! They are so intricate and custom. You knocked this one out of the park, girl! -shaunna 🙂
thank you for this tutorial (and yes, i think you can call it that). i found it very easy to follow and i even want to try it! i love the box pleats too, so i need to figure out how to do that.
first of all that second one looks amazing. just as the first one did.
and, i think you did a GREAT job explaining how you went about making it. as i've said before, i'm dying to attempt to use my sewing machine and completely intimidated by it. so the fact that you shared what stitch you used, boosts my confidence! thank you for that!!!
and, as if you've never heard this before *wink*, Lillie is stunning. and i read in a previous post when you answered back about her name, and i'm in love with it. my hubby and i hope to add another little one to our family someday (kinda soon) and although we've been set on a first name forever for a girl, the middle name has always been a toss up and i like "Lillian" and "Anabelle" quite a bit! i've always wondered where you shop for her since she's always dressed so adorably! is that something you'd share? 🙂
thanks again for the additional little boost of confidence in sewing a slipcover of my own.
-xx
Amanda
oops. *Annabel* sorry. 🙂
I love it!! Your tutorial is VERY easy to understand — so beautiful! 🙂 Great job to Lillie on an adorable outfit too!
I don't even own a sewing machine. I had a small Holly Hobbie style one and my husband had to keep fixing it for me because I always managed to break needles or jam it. I am not very quick in the sewing department! You are one talented cookie! That ottoman is fantastic! Miss Lille is adorable as always! I love that she picks out her own stuff. She is getting so big and will be such a big help when the baby comes!
Oh I just love both of the slipcovers! You make it look so easy!
Jen! Your are so talented! I wish I could sew like that! I love how the ottoman turned out! Your images are stunning I love how you photograph! The mirror is beautiful love and enjoy your posts! Belly is getting bigger by the moment! Hope you are well! Hugs Lulu
You make that look so easy! I really love how the ottoman turned out. The lines are just perfect. Not too frilly. Love the mirror as well. Awesome job!
Its just LOVEY!! and I LOVE that mirrored dresser you have in there-its perfect!
Thanks for mailing my stuff- I cant wait to get them!!!
Have a great weekend!
You are amazing!! Seriously, I love this!!!
XO
i know, last february, one of the then 3 year old twins had on 5 T SHIRTS, wind pants and uggs to go to a bouncy place. sometimes we have to decide if it's worth the fight, hehe.
Glad to hear that at 30+ years old you still receive "birthday money."
Brilliant! I don't sew well either so it made perfect sense to me! Love your beautiful rooms and Lillie is so very beautiful! Thanks for sharing. I have a pitiful leather ottoman that needs this makeover to be usable again! Can't wait!
I have this same ottoman, but mine is ripped on top so I slipped it last week and I'm getting ready for the reveal. You did a great job explaining, if I'd seen this I might have done it your way instead of what I ended up doing.
PS Your little helper has wonderful fashion sense. My youngest daughter used to "layer" her skirts too – maybe it will catch on!
Love the slipcover and your instructions were very good! I am wondering what brand of sewing machine that is. Seems like everything I want to make requires gathers and mine sure won't do that. Share that info, if you can, please. Love your blog.
Ok, great tutorial! But what I really want to say is that I am sooooo jealous of the new mirror! It is awesome! Love ya!
Tutorial, slipcovers, mirror, daughters outfit…all of these are superb!
I have an ottoman crying out to be dressed. This post is really going to help.
Angex
LOVE the ottoman slipcover and that helper – what a stunning child!
Thanks everyone!
Amanda – most of her clothes are either from Target or Baby Gap. We haven't had to buy her very many things, to be honest, because so many family members are always giving them to her! Target has lots of cute cheap stuff and then for her birthday and Christmas we splurge on the Baby Gap stuff and we have a Ralph Lauren outlet near us too that has adorable things. My mom makes her a ton of stuff too and my sisters make her lots of accessories (hats, hair pieces, etc). Oh and I actually love it spelled Annabelle or Anabelle better than Annabel but we went with the Annabel option because Lillian already had so many L's! Haha!
Jas – hmmmm….first of all, I haven't even hit 30 yet, thank you kindly, and second I am pretty sure you enjoy receiving your birthday money even more than I do! Hmmmmm…..speaking of that, I think come your bday I may remember how much effort you put into mine this year! =)
Life in My Nest – I have a Singer. It's a pretty basic one, no bells and whistles but it is easy to use and works great!
I am a recently new follower and love your blog!
I just awarded you with the Stylish Blogger Award!!! You can go to my blog for the details!!
Erica @ http://bigsislilsislove.blogspot.com/2011/02/stylish-blogger-award.html
They're both beautiful, what a great sewing job you did, the lines are perfect. Good luck!
You did a great job on your tutorial, and the ottoman looks beautiful! I love the picture of the little helping hands. 🙂
I loved when my daughter started picking out her clothes, she came up with quite the combinations! They start to develop their style!:) Now she looks at some of those pictures and laughs and says "I put that together?"
Have a great weekend!
Jodi
Jennifer,
Thank you so much for the "tutorial"
I do not sew but I really want to learn. I look around and think I could take some basic lessons and make some simple things for Kate and for around the house. I loved your step by step instructions and your humble way of explaining because you actually made me feel like this is something I could do. Of course I do not even have a sewing machine:) But I do feel completely inspired to learn. May I ask how you got started ? What is a good beginner machine??
kim
P.S. I forgot to say…I LOVE both covers. You have great vision and skills:)
Thanks, Kim. My mom sewed so every now and again when I was little I would make a nice basic square pillow for my room but didn't do much beyond that. Then I asked for a sewing machine for my birthday shortly after Jon and I got married because I wanted to be able to make pillows, draperies and anything else in custom fabric but of course couldn't afford the price on stuff like that. I ended up just messing around and starting to make stuff or our first home and now this home and basically just learn as I go (which makes for LOTS Of mistakes!) I have a pretty basic Singer (I think it was somewhere between $200 and $300) and it works great. I would highly recommend it. It's pretty easy to use.
This is absolutely gorgeous! The whole room is! I, too, love the pleated one the best, but I have a HUGE thing for pleats!
Both your slipcovers look very pretty and simple. That's really handy that your sewing machine actually gathers the fabric for you as you go along.
Hi Jennifer, You did a great job on this tutorial and as you know I LOVE your taste. And I'm so glad you always include pictures of the darling Lillie. She the prettiest child!
Warmly, Michelle
Fantastic tutorial! I can't wait to make a couple of these. We too have leather ottoman, 2 actually and while they go well in the "den" area, they don't really work with the overall theme we are going for. This was just what I needed…to see how simply it can be done! Although I have to say I like the one with more pressed pleats better too!
thanks so much for your response. Target and BabyGap happen to be my absolute two favorite places to shop for my little guy so i'm certain if/when i have a little girl, that won't change. especially considering how adorable Lillie always looks. 🙂 p.s. i also attack the toddler clearance Ralph Lauren at Macy's (where i work) often! so it's funny you named those three places, i already love.
as for Annabel, i like the spelling. 🙂 buuuuut, i must admit i've since fallen in love with Lillabel. hubby and i have had a first name picked out for.ever. and it's beautiful with Lillabel as a middle name so if ever we have a little girl, i may just be begging you to let me steal it. 😉
thanks again for all of your feedback. i can't rememeber if you mentioned the gender of the baby on the way or if you're even finding out but i cannot wait to see the nursery you put together. considering i want to copy the rest of your home into my own, i'm sure we'll all be head over heels for the nursery.
xo-
amanda
Does your daughter like younger men? My son is 11 months- they'd be so cute together! Ha! 🙂 She really is adorable and the ottoman is just great! I just found you via Decor Chick!
Hi!!! I love your posts…and another thanks on showing how to sew the ottoman cover…it looks super good! Also do you share where you purchased your furniture (sofa, and chairs) Or did you have them recovered? I am moving soon and would love to redo my living room furniture! AND your little one is ADORABLE!!!
Thanks
THANKS Jenni for sharing! I am going to try to cover a stool I use for pics. You are so kind for sharing! LOVE Lillie's outfit. She has GREAT taste! 😉 She also looks so grown up! HUGS!
LOVE how this turned out, and great tut! Lillie is adorable!
I adore these slipcover and the pillows on the sofa. What a cute girl you have.
Oh, stop over to my blog for my giveaway that you will like.
Great job!! It fits so perfectly and looks professionally made…and she is a living doll!!
Wow, Everything about your house is so beautiful! This is my first visit here and your decorating taste is so perfect and beautiful. I want your house. Your daughter is so precious too! Thanks for a great tutorial, it gives me a great idea!
Heidi
http://www.honeybearlane.com
"Craft. Sew. Learn. Grow…One Puff Quilt at a Time!"
Thanks, everyone! Can't wait to see your stool, Jenn!
Jessica – our sofa is by Lee Industries. You can go to their website and find someone near you that carries them. However, we got ours at 1/3 the retail price =)….they are normally REALLY expensive. Both of the chairs in the room were rather gross and we got them recovered. The wingback chair was free – it was my uncles and I painted it and then spent around $90 or so having it recovered and the small side chair in their we found at a used furniture store for next to nothing and had it recovered for like $60 or so? I can't remember but it was cheap! Where we lived in SC they had this place that reupholstered so inexpensively that it was easier just to have them do it than to attempt doing it myself! Where we live now in VA it is sooooooo much more expensive so that is why I have now started trying to figure out how to make slipcovers! Haha!
Hi there- absolutely adore your slipcover- and your room is gorgeous!! New follower here- stop by and say hello sometime! 🙂
I have a leather ottoman that I've been going back and forth with myself about covering. After seeing yours I think I'll go for it. Your home is gorgeous!
Love this – i am popping over from My Uncommon Slice of Suburbia to take a peek at what you did….so inspired – makes me wish i had a sewing machine! xoxo
Tracie
Everything on your blog is gorgeous! I found you on Shabby Chic Cottage and am your newest follower. Can't wait to see what else you do!
Jen
Scissors & Spatulas
You are amazing!!! I am in love with those. I think I am actually inspired to try it for one we have. Great tutorial and your daughter is beyond precious.
Your room is so pretty! Just found you through My Uncommon Slice of Suburbia~ lovely blog!
I love this entire room! You have a wonderful eye and taste. Both ottoman covers (and the outfit) look beautiful!
This is beautiful and congrats for being in the top five for the copy me challenge. Wonderful!!!
Penny
CONGRATULATIONS!!!
I found you from MissMustardSeed. Congrats! I've spent the last 20 mins lost in your gorgeous blog instead of flipping laundry or working on my own blog 🙂 Your style and photography is wonderful. Glad I found you. Sarah@ NorthwestHospitality.org
Oh My Gosh! I just found your blog, and it is amazing! I can't wait to dig around some more, in the meantime your ottoman slipcovers are fabulous!, your photography is stunning, and your blog looks just beautiful!
Cindy
Stopping over from Miss Mustard Seed. Congrats on being a finalist! Loved this post and the tutorial. Your little cutie, Lillie, is adorable and a great model.
Monique
Visiting from Miss Mustard Seed. Congrats on being a finalist! Your home and family are beautiful. Little girls are such a blessing. We had two little girls that our now married. Love her outfit today! So precious. Hope all goes well with your new little girl in May. May 22 is a good day (our oldest's birthday).
~ Julie
I missed your post during the Copy Me challenge. Your room is so beautiful I love all of the details – esp. the old looking mirror. Your daughter is all kinds of cute, I love her eyes! Hugs, Kim
Beautiful! I love the trim above the ruffle. For the pleats, you may want to check out the Quick Pleater tool on my site.
I have that exact ottoman and I'm currently in the process of making a slipcover for it! If I could find my straight pins I'd be done by now. This looks fantastic. So sleek and clean-lined. Check in with me in the next few days, mine should be up on my blog, http://www.piecesofmolly.blogspot.com
Oh wow, I just discovered (somehow, a little late) your blog! I am in love. This ottoman tutorial is EXACTLY what I needed, you wrote it out so simply and so detailed, I actually think I might have some success. I am a beginner sewer, so I'm still hesitant. I love your style, love your blog… will be back here for sure!
Love the ottoman and enjoyed the tutorial as I have several ottomans that I would like to make new slipcovers for and just might try it now. Love the fabric, what is it? Thanks…Angie
I am not sure what the fabric was called for the pleated version but for the ruffled version it was a fabric called Osnaburg in Natural. It looks a little bit like linen but is WAY cheaper!
I just made this slipcover today! Thanks for the instructions 🙂
What is the name of the trim you used? I couldn't find anything like it at Hobby Lobby. It's like a fabric ribbon, right? I was having a hard time explaining what I was looking for, so just curious if it has specific name or if you can point me in the right direction. Thanks!
Christine
I'm visiting from Red Door Home, and have been cruising around your lovely blog. You have a gorgeous home and adorable daughters!
I love the slipcovers, and I think you did a great job on the tutorial. I understood it perfectly. I even have a similar ottoman in storage that I think I am going to have to pull out and make a slipcover for! I'm going to follow you 🙂
I have recently started a web site, the information you offer on this site has helped me tremendously. Thanks for all of your time & work.
HYPERCOM P1300 SERIAL PINPAD DEBIT CARD KEYPAD
I am in love with your blog. I am just learning to blog myself. This is such an inspiration to me.
Great tip about putting the fabric on the ottoman backward for sewing purposes. Ottomans in different fabrics and prints are fun, just like this. Thanks for sharing!
You've done a fabulous job and your photos are beautiful too! I have this linked to my slipcovers post as well today, for inspiration!
Thank you so much for sharing this tutorial! I found your post over at Boogieboard Cottage. The timing is right as I just bought a little footstool at the thrift store and wanted to make a slipcover to go over it. I bought it mainly for keeping my feet elevated when traveling on the train, as well as, when sitting at Bible conventions. It really helps in keeping the swelling down on my feet and legs. Hope you get a chance to visit and share one of your projects at my Frugal Treasures Tuesday party. Thanks again. ~Bee~
This is crazy awesome! I love it- and it's exactly what I was looking for. In fact, I'm slipcovering a similar brown leather ottoman! Funny.
Anyhow- I was just wondering where you got the cording you glued on? Thanks and I'm pinning for future reference!!
xo Becca
Thanks Becca! I got it at Hancock Fabrics in Williamsburg, VA!
That is the most beautiful little girl I believe I have ever seen. I have a son so I can say that without hurting the feelings of my own child. She is just precious. And the ottoman turned out gorgeous. I am about to tackle this same project so thank you for your tutorial, it was perfect.
Thanks for the amazing tutorial. I can't wait to try this on my ottoman. I love your style and taste in decor. Great job!
I've been planning to freehand an ottoman slipcover. This post just encouraged me to go for it! It's absolutely lovely!!! Two questions, if I may … 1) what fabric did you use? I too want something I can slip off and launder
Sorry for the incomplete comment! My iPad was acting strange. Anyway, your fabric looks like linen? But most decorator weight linens I can find are dry clean? And secondly, can you share your source for that fantastic mirror?
Thanks! I used a 100% cotton fabric – it does looks like linen, though, which I would have preferred but needed it to be more practical. The mirror is from Restoration Hardware. I am pretty sure they still have it but it now sells for considerably more than what I got it for. =(
I made this (except I did the one with box pleats). Just wanted to tell you thanks so much for your tutorial and the inspiration. I'm so pleased with the way my ottoman turned out. Here's my blog post about it: http://www.blackandwhiteandlovedallover.com/2012/08/stuff-i-made-ottoman-slipcover.html
Thanks for blog 🙂
I love the hand made softness of your home and your daughter is very beautiful especially wearing the red hat and sweater aww