

We pretty much have zero storage space in our home. Because of this I am
always on the lookout for pieces of furniture that can be used as
storage. Upstairs we just have one teeny tiny linen closet and then each
bedroom has a small closet. Neither of the bathrooms have one so trying
to find space for towels, washcloths, and bed linens has always been a
challenge. I have been on the lookout for either a tall dresser or
cabinet/armoire that would fit in the little space in the hall upstairs.
I have found a few things over the years but they have always been too
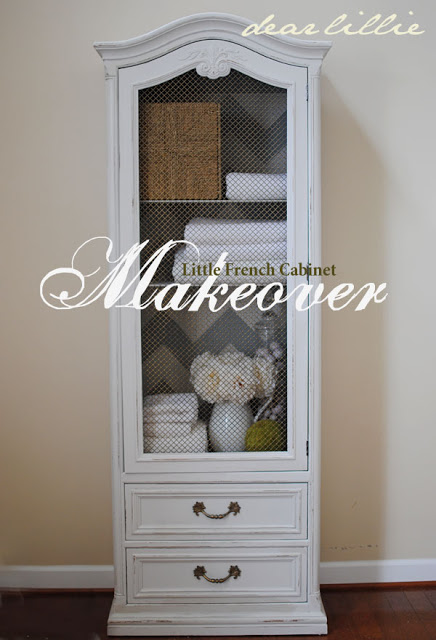
wide and would not have fit. I had pretty much given up until I saw this piece in a used furniture shop here in Williamsburg. It was a good price and I loved the lines of it and it looked like it just might be narrow enough. After measuring the wall again at home to make sure it would indeed fit I got pretty excited about it and my mom and dad bought it for me for my birthday. Last week I finally got around to painting it!


Once the whole outside of the piece was painted I sanded it down in some areas to give it more of a distressed feel. After that I painted the inside with a darker grayish blue by Benjamin Moore called Cobblestone Path (I think….I will have to check that one to make sure). I did choose the Gray Owl intentionally but for the inside I just went out to the garage and looked through my stash of extra paint and I thought this color complimented the Gray Owl best. If I had been able to just pick any color I would have gone for a slightly lighter less blue color but I am still happy with how this turned out.
After the inside dried completely I got really torn on what to do with it. I had been wanting to paint something chevron for a few months now but really didn’t have the right place/piece to do it. I thought it might work but then realized how much work it was going to be so I kept talking myself out of it. Plus I was worried it might look a little too modern for this particular piece. Eventually, though, I knew I would be disappointed if I didn’t at least give the chevron a chance so I started taping it out. Ugh! It was a total pain and I have to say I don’t plan on doing it again any time soon! In fact, I almost gave up midway through. I wanted my chevron stripes to all be the same width, but in order to do that I had to tape accordingly, which makes some of the lines look skinnier (although once you pull the tape off it will make them even back out). It was a hair confusing to start with but not too bad once I got going.


Now we just have to get it back upstairs. These pictures were taken down in our entryway area because it hasn’t made it’s way back upstairs yet. I can move it from room to room but can’t get it up stairs – it’s heavy and rather awkward to lift. A few of Jon’s players
originally helped us get it up stairs when we first got it back in early January, then our friends Austin and Kelly
came over and Austin helped Jon get it back downstairs last week so I
could paint it…now we just need to rope one of the players into coming
back over and helping us get it back upstairs.
I hope you all have a wonderful Monday!


it's so cute! i love the chevron backing!
Beautiful color and love the unexpected chevron design!
I love the painted backed and the wire front. I sooo need extra storage in my home too, but I just don't have enough wall space to fit the pieces. Great find and great job.
You always have the best posts! I love the way you painted it. The chevron is something you wouldn't expect to see – that's what makes it so special!
LOVE IT Jennifer!! It looks gorgeous painted and I love the wire door!
Jenni, only you can make towels and washcloths look gorgeous! That piece is wonderful and the chevron is the perfect touch! I am taping Nate today and can't wait to see you on there! I am so excited! Have a wonderful week!
Jennifer, the piece is really pretty and the chevron is a great pop! It is very classy…..just like it's creator! Have a great Spring week!
How lovely! The stenciling is beautiful!
Hi Jennifer,
I never ever would have thought to paint chevron on a piece like this. It is stunning! So unexpected and adds a bit of whimsy to a classy piece.
Now I want to paint something chevron and I know I will also be as frustrated doing it as you must have been.
Thanks so much for sharing.
Jennifer, I love the new look, and the chevron back adds just the right update. Congratulations on today's appearance on The Nate Show! You did a great job. So glad your talent is being recognized!
Beautiful piece. Love the new color. Hugs, Marty
I looooove pieces like this for bathrooms! I am on the hunt for one to go in my downstairs bathroom.
Love this cabinet!! Saw you on Nate this morning you did fantastic!! I would have been a mess!!!
Hi Jennifer,
This piece looks great!.
I have a couple of questions:
1. What # grit sand paper did you use on your coffee table top?
2. Did you sand down this current cabinet or did you just paint over the wood?
Thanks Karen! I am not sure the #grit but I will try to remember to check for you tomorrow and leave a comment here. As far as sanding – no, for this piece I didn't. I was planning on it but then decided to just put a quick brush or two on and see how it looked before I sanded it and it went on so smoothly I decided to not even bother sanding!
Love the chevrons INSIDE….too many forget that that back wall is seen….why not make it pretty? Great job!
Lorraine
The cabinet looks fantastic. The chevron gives it a beautiful twist. I always love your choices. Looking forward to the "Nate" show today!!!
OMG! OMG! OMG! You are on the Nate Berkus show right now! Your home is even more beautiful on TV! Sorry for all the exclamation points but this is so exciting. You are doing a fantastic job and don't appear nervous at all. Gotta go, can't type and watch all at once. Oh ya, you are absolutely beautiful as well 🙂
I love this piece, and you transformed it so beautifully!!
As usual, great piece and your taste are extraordinary in everything you show in your home. A long-time admirer! highpointcircle.blogspot.com
A-maz-ing! I love everything about it, especially the chevron!
That looks really good. It's amazing what paint can do.
Oh its so pretty! What a nice little french cabinet for your bathroom! I love the tip on the wire~my cab in the dining room has removable glass and wire so I was lucky. Everything you do turns out lovely!
Holy crap!! I missed the Nate show!! Will you post a video link???
Hey Amy – here is the link to Jenni's House Proud segment: http://www.thenateshow.com/videos/detail/3992/house-proud-virginia
The second life of the furniture!
charming!!!
Beautiful!!! The chevron is perfect!!
Love that makeover!!! And turned on the Nate show just in time this morning!! Your house is beautiful, but I already knew that! You inspire me 🙂
I walked into the family room, just as your piece was on The Nate Show. It was so exciting to watch! You did a great job! Cindy..now back to reading this post.
That is gorgeous! A true labor of love. I like Lillie's addition as well! I'm ready for Nate today! It come on late afternoon for us. Happy Monday Jenni!
House Proud: Virginia
Take a peek inside this Virginia mom's home to see why she's so "House…
Congratulations Jenni!!! Loved seeing you on the Nate Show! Your home is so warm and inviting. Thank you for sharing all your tips and creations with us. Please let Lillie know she did a great job on the cabinet.
Happy Monday! Hugs.
I'm thinking it would be easy to "rope some players in" with promises of Jamie's cookie dough bites! Beautifully done!
Just saw you on the Nate Berkus Show. You were great-didn't look nervous at all! You are one of my favorite bloggers and your house is even more beautiful on TV. Congrats!
I"m new to your blog. I came across it on pinterest. I absolutely love your decorating style and think your house is beautiful! Would it be okay if I pinned a couple of your pics on my pinterest page for my own home ideas? Also, where are the white towels with the ruffle from? Thanks!
Pin away, Emily! We are definitely a pin-friendly blog! The white ruffle towels are from Target. I've had them for a few years now so I am not sure if they still carry them or not. Have a wonderful week!
Just Beautiful Jenni as always!!! Just saw you on the Nate Show!!! You were fantastic!! Have been following your blog and purchasing from your shop for over a year now, loveee Everything, you are very talented!!! Moira@navigators.com
Loved your spot on the Nate show today! Your home is so beautiful and I just want to thank you for sharing how to make the pillows. Of course I was hoping you would have been able to show how to get the script to look so nice from the paper onto the pillow. I have black and white damask cushions on my porch and am looking for ideas to simply change out the pillows this Spring. You did a great job and seemed so comfortable…of course you are such a beautiful person. Jeni
I love this, you did a great job! oh and I really like the Chevron too:)
GREAT LITTLE REDO. BY THE WAY, SAW YOU ON NATE BERKUS TODAY!! YAY FOR YOU!!! TERRIFIC JOB!!
Love this piece and i think the Grey Owl color looks fantastic. So pretty!!
have a great week
~Cheryl
I love this! Love the chevron! I used Grey Owl in 2 rooms, one looks more blue than the other, but I do love the color!
I dvr'd the Nate Show today and couldn't wait to come home to watch. You did a fabulous job. I loved seeing your home again. I've always wondered how you do the pillows. I love your blog!!! Melissa
What a wonderful present from your parents…It's beautiful…Great job on the painting…
It's perfect! When can you bring it over, giggle. Hags
That cabinet is so gorgeous and you really have it styled super cute!!!
Love it; the chevron pattern is so sweet!
I've been browsing your blog for a while now and it was great seeing you on Nate today. Such a surprise! Love your decorating style. My husband and I have downsized and I appreciate your sense of style and your ideas for living in a smaller space. Thanks for the inspiration!
Beautifully done…should we expect any less? I was so happy to see you on the Nate Show. It was a thrill for me to see as I've been following your blog for some time now. Great job!!!
I adore your French cabinet makeover!! It is a gorgeous piece and I love the chevron backing!
Oooh – I love it. I always see peices like that and think, 'That would look amazing with a paint makeover.' Love the job you did.
Nancy
http://ofwoolandloveliness.blogspot.com/
I love it! Everything you touch is gorgeous! I have been reading for a while and this is my first comment. 🙂 I forgot to record Nate Berkus and freaked out and went to his website and your segment was on there. Thank goodness. You did a fantastic job. You looked like a total natural. Congrats!
Pretty French cabinet. Looks like a lovely piece
Beautiful! Now where can I find my own team of strong, able-bodied men to move my furniture around?? 🙂
That cabinet turned out great, Jennifer! You have a lot more patience than I would've…it takes me forever to paint something without a pattern 🙂
Very beautiful, and what a great size. You do really have alot of patience, not sure I could have hung in there. Watched you on Nate Berkus yesterday, you were fantastic. I have been following your blog for about a year, you are so inspirational and this helps me in my home decorating. I just received by bunny shilouttes in the mail, they are so cute and I ordered the bunny shiloutte pillow cover can't wait until it arrives. Shelley 🙂
I really like all of you recent works. The pillow is so nice and I hope I can get in soon enough to get a 2 of them! One for me and one for my daughter's home. Easter is my favorite holiday. Easter bonnets, bunnies, flowers, and Jesus's triumphic rise. And the cabinet is charming. I would like to try a gray paint and really like Ben Moore's paint. Did you wax this after the painting?
Also, I really admire how you include your daughter in the home improvements. Her work is so cute, but really good. Tell her we all think her parts of the jobs are visibly evident and superlative!
Thanks, Karen! I actually did not use a wax on this piece. I did on the coffee table, though. I am not sure yet if I will on the cabinet but am leaning towards not. And I will tell Lillie =)
Gorgeous talent – I admire your talent!
Jennifer, I love this! The chevron design looks wonderful and adds so much style. Hugs, Sherry
Jennifer, your little linen cabinet is beautiful… and you did the most gorgeous job bringing to a stylish life! I love the color Owl grey… I'm going to have to use that on something…it is so pretty!
I am blogging again and so happy to visit!
Yvonne
WOW, You are truly gifted and I love your style. The cabinet looks beautiful, great job!
I so appreciate your talent. I was so pleased to see you on Nate, BUT I was disappointed he didn't mention your blog or shop. Celebrities promote their stuff all the time. Did I miss something? Please let people know where to find you next time! 😉 I know where to find you, the rest of the viewers should have the opportunity, too.
hi! saw you on nate! it was so exciting to see another blogger on his show. love your blog and your home! thanks for all the great ideas.
Beautiful cabinet! Your paint color choices and pattern are perfect for that piece. Wonderful job.
It looks great! What a great size! And the bonus artwork on the back!
Debbie
Looks great! Did you prep the wood at all before starting to paint? I haven't had any luck doing that…the paint always chips off so easily if it isn't sanded or primed! What's your trick?!
I actually didn't for this piece. I had planned on sanding it, but when I brushed the first stroke on just to see how it would do it went on so smoothly and nicely I decided just to go ahead and skip the sanding it step. I may regret it a few months from now, though. =)
Love it!!! (Like all your projects!)
Quick question….do you use a semi-gloss paint when painting furniture pieces? I have a few pieces I want to start working on and wasn't sure which sheen to get.
Thanks!!!
Thanks Alyson! For this piece (and the coffee table a couple weeks ago) I actually used a matte finish because I wanted a really flat, milky look. I would normally suggest more of a semi-gloss though if you would like the paint to be more durable.
Your cabinet has such a great shape, and looks so updated and fresh with your makeover. Your daughter's contribution is my favourite part! You are a good mommy.
What a fantastic piece you have made over. Love it, great job. Sandy
BEAUTIFUL! I love this! I have a brown hutch that I'm going to go paint right now. :o)
ok I've gotta ask- how do you know where to sand the paint off to give it a more distressed look? And how long do you wait until the second coat of paint is dried before you start distressing the piece. I just finished painting a coffee table ballet white. It looks great – but I really want to give it the distressed look but I'm scared I won't do the job right, and then it will ruin the entire paint job. Any pointers from the pro?!?! Thank you Jennifer!
Hmmm….it's hard to say. Each piece is different and I generally just kind of wing it. =) I generally start though, by rubbing the edges that naturally could have been worn over time and then once I've done that I work from there adding it in other spots to help balance the piece out. I would recommend by just starting a little bit here and there and living with it for a day or two and then add spots as needed until you get used to it. Ballet White is such a pretty color! I am sure it looks beautiful! As far as waiting. I would recommend waiting a day but honestly I seldom am that patient and quite often I do it just a few hours after painting it.
You're the best! Thank you so much! 🙂
The little french cabin makeover is shared in the post here. Good post
Your home is so beautiful and I just want to thank you for sharing how to make the pillows. Of course I was hoping you would have been able to show how to get the script to look so nice from the paper onto the pillow. the wire rope was awesome to see!