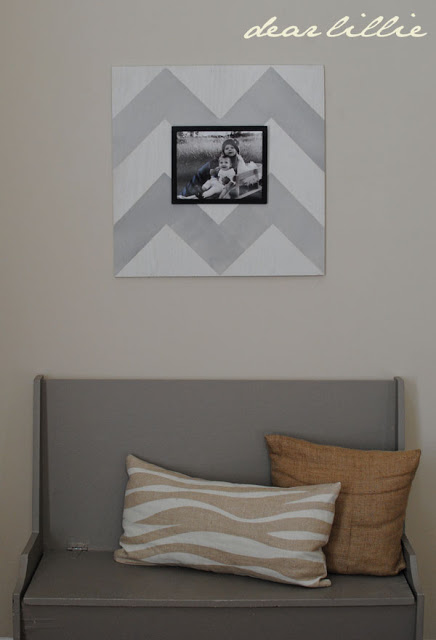
A little while ago I saw this frame on Pinterest from a really talented Etsy artist, Delta Girl Frames but realized that they were really hard to get your hands on and out of my price range, so I thought I would make my own. The one above was a gift for my sister, Dana a little while ago but didn’t want to post until I had given it to her. I recently saw one of my blog friends, Melaine, make something similar as well (love the pattern she used!) so I guess I wasn’t the only one with this idea – haha! I have to say although I love the idea, I didn’t execute it as well as I had hoped to. I did the chevron way too big. I was going for bold but I made it way too bold. For Dana’s I didn’t distress it too much because I didn’t think that would go as well with the style of her city apartment. (I made some for myself too, and I distressed those a bit more – I will show you them tomorrow and where I put them).
The cool part about these is that it is really easy to change out the photo!
1) First I painted a 24 by 24 inch board gray.
For Dana’s I used London Fog and Ballet White.
2) Then I measured out every six inches and made a little dot with chalk.
(I wish I had done every three or every four inches instead though).
3). With the chalk I connected the dots to make a chevron pattern.
4) Then I taped it off so that I could paint in every other v of the pattern.
5. Then I just used a roller and painted it in and then removed the painters tape once it was dry and then cleaned up the chalk marks (you can see them before I got rid of the chalk on the upper line here in the picture below).
6). For mine, I then sanded them down and then rubbed this stain over them.
6) I hammered in a small nail to hang the frame on.
7). Then I just popped a Dollar Store frame on the nail and hung it on the wall!
And yes, I think the frame looks a little funny there, this is what I actually have above that bench but needed to photograph Dana’s frame somewhere, and that was a nice easy spot that already had a hook.
I hope you have a fabulous Monday! I will be back tomorrow to show you the five I made for our house and where I put them.


Very nicely done! The colors are lovely and the chevron size looks perfect in the pics! The black frame really pops! Appreciate your detailed tutorial and pictures! BEAUTIFUL!
Good Morning Jennifer,
Chevron just never seems to get old. I guess we could call it a classic design. Love the frame, especially since it stars a little cutie pie smack dab in the middle!
XO
How pretty. I love it and such a great tutorial. Hugs, Marty
Happy Monday! Thanks to YOU it is! I always enjoy your ideas, tips and tutorials. You inspire me, thank you.
All this pics are beautiful, but the last one stole my heart! Precious!! The frames made the pictures pop!
Happy Week! Hugs
P.S. Your new profile pic is beautiful!!
Uh oh… I was headed to home depot this morning anyways, but now it looks like I am going to be bugging the wood cutting guy while I am there. 🙂 this is fantastic- and I actually liked the big chevron! (I will probably do something super gussy though. Can't help it…) thanks for a fantastic idea!
Love love this frame- adorable! Can't wait to try it out! New follower for sure – I love ur blog!
I like yours better! 🙂
How cool is that!!! What a brilliant idea to put a frame on top – will definitely be trying this. And, the photos of your girls just melt my heart!
An insanely talented photographer must have taken your new profile picture…
Thank you for the chevron tutorial. Love the profile picture with you wearing the rosette trimmed tee. Would love a tutorial on the rosettes!
Lovely!
You did a beautiful job on the frame! Great tutorial – I'll have to give it a try. It's a lovely gift. You look gorgeous in your new profile photo, Jennifer!
These turned out great! I also have these on my pinterest-inspired project list . . . I'm going to paint some awning stripped ones! :). I hadn't thought to give them as a gift – great idea! I bet your sister loved it.
Oh how I love all of her items! I cannot say exactly which is my favorite because they're all so touching and heartfelt!!!! I also "liked" her on FB so please enter me a millions times because I really, really want to win 🙂
Tracy B.
Simple and artistic, You made a good framing here.Thanks for this guide.
Hi! Darling frame, I love it! Question though, where did you get your 24×24" board? I want to re-create this!
Thanks!
Thanks! I got it at Lowe's.
These are amazing!!! I definitely want to re-create for our master bedroom. It'd be great in our hallway, but with our stencil, it'd definitely be a little much. Thank you for the inspiration! You and your home are gorgeous! 🙂
Very creative! What inspired you to come up with these beautiful crafts? I would love to have instructions to make some or be able to purchase one! Ive never actually seen a background for your frames in Edmonton before!
So Cute! What kind of wood was it? MDF? Such a cute idea…
Thanks! And oh goodness–It's been so long I don't recall! I wasn't MDF though. It was just the most inexpensive 24"x24" wood piece at Lowe's at the time.
Love these! Just bought the boards at HD (I think it's MDF, they were only $1!) How did you hang them? I'm struggling with that part! 🙂
Thanks, Jeannie! If I remember correctly I just bought the biggest sawtooth hanger I could find at Lowe's.
Hi! Can you tell me how thick these are? And did you do anything to finish the edge or is it just the raw plywood finish? Thanks!
Hi! I'm not sure the exact thickness, but I would guess 3/4". It was the ticker of the two options at Lowe's. I was worried the thinner options might warp over time.
I hate to bother you but can you give me a bit more directions on how you did the markings for the chevron pattern? So did you mark up the side of the board 6 in? So how thick is the actual gray chevron? I'm confused and am trying to figure it out. Thank you!
Hi! Each chevron line is 6" wide.
I've always liked chevron. I love the colors used and it adds a certain style. I'm a realtor and I can see the frame working in several different rooms to add a little style. I might have to make one to try on one of my listings. Thanks so much for the tutorial.