I may have to let Jason guest post more often! I think he enjoyed reading your comments as much as I did. This summer he is going to be taking over the business side of Dear Lillie. Despite his claims, though, he will not be taking over the artistic side, but maybe I will let him do a guest post every now and again so he can exercise his writing skills and mock me…or maybe he can find another family member to pick on next time. Although I am sure after having me boss him around on a regular basis he will probably have lots of complaining to do about me again!
I also want to thank you all for your continued prayers for Lola Wren! We truly appreciate it and will be sure to let you know once we get the pathology report back.
Now onto the tutorial!
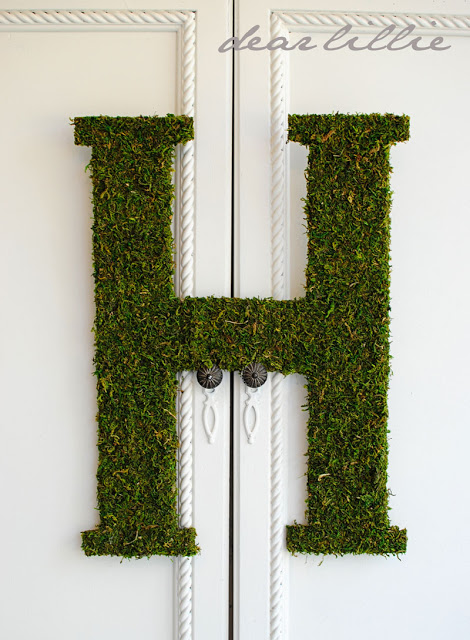
A while back I mentioned how I loved the large moss letters that Pottery Barn was selling but they were sooooo expensive! ($79 each plus shipping and handling) We did a tutorial on how to make a smaller version of them and I used those in dining room. However, I still wanted to make a large one. I couldn’t find a large enough base letter anywhere, though! I finally decided just to use what I had and make my own. I found a large cardboard box in the garage and cut out an “H”. By using cardboard you can make the letter(s) any size you want. Mine is about two feet tall. It also allows you to make any assortment of letters you want – all for free! When I did my last post I wasn’t able to use any of the words I wanted because the craft store was missing so many letters. I also was FINALLY able to get my hands on the moss that comes in sheets! We just had a new craft store open in Williamsburg and they carried it. Before that I hadn’t been able to find it anywhere.
1). First, draw your letter on a piece of cardboard.
It’s okay if you mess up because you are going to be covering it with moss anyway. It may help to use a ruler for any straight lines or to make guides for curves (I made a C for my mom and a D for one of my sisters to cut out and used a ruler to make sure my curves were the same width where I started as they were at the end).
2) Cut your letter out using scissors or a box cutter.
I was lazy and didn’t feel like getting up to get my box cutter so I just used scissors. It worked fine, but it would have gone much more quickly had I just gotten up and gone to the garage and gotten my box cutter. In my defense, though, I made this the day before I had Lorelei so I was not exactly full of energy!
3) Now start up in one corner and put some hot glue on the cardboard.
(Work in small sections so the glue doesn’t harden before you attach the moss).
4) Now place the sheet of moss over the glue.
You want it to overlap the cardboard – do NOT trim it!
5) Cover the whole letter.
It doesn’t need to be perfect or even close to it! Just make sure it is completely covered and you have enough around the edges to fold over onto the back.
6) Now flip it over.
In retrospect I wish I had even more moss overlapping but it was my first time and I was just “winging it” so I wasn’t sure what I was doing. In the future I will have it overlap even more.
7) Use more hot glue and fold over the edges onto the back.
8) You’ll have to slice the corner areas a bit to get them to fold over.
9) Once the edges are all folded and glued start adding glue and “patching in” the empty spots with strips of moss.
Keep going!
And there you have it!
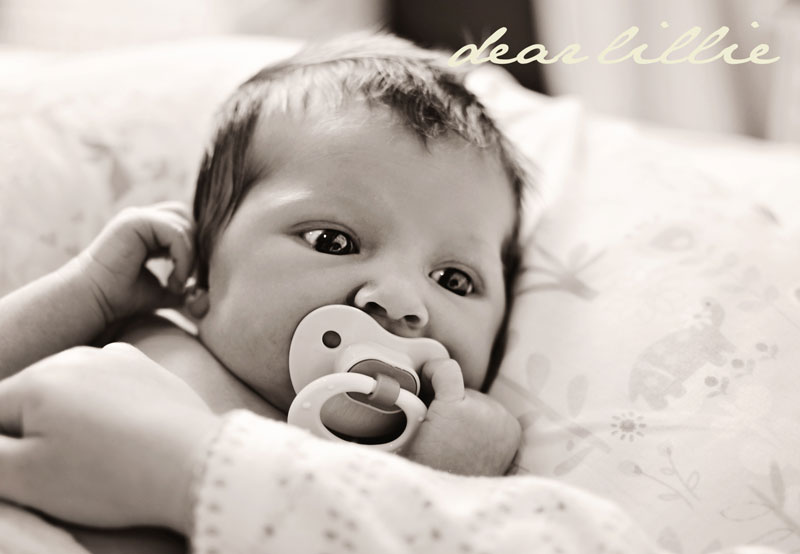
As I mentioned I made “H” the day before Lorelei arrived. I also took a bunch of pictures of Lillie in an adorable dress my mom made her. She just made a matching one for Lorelei that arrived in the mail yesterday so I am going to take some photos of them wearing the dresses together at some point. Here’s a shot of Lillie, though, on one of her last days of being an only child!
And here are some quick candid shots from this morning of the girls snuggling in bed. Although I am NOT a morning person, this past week I have really been enjoying my mornings as Lillie, Lola and I all snuggle up in bed. Lillie begs to hold Lola and it is so sweet watching them together. I wish I had taken a minute to tame Lillian’s wild and crazy hair – oh well. I got it tucked behind her ear for one shot and then it went back to being everywhere!
This is long overdue but I wanted to announce the winner of the Baby Guessing Contest! Congratulations to Picture Perfect Pixies!
She guessed the date and weight exactly!
Send us an e-mail at dearlillie@hotmail.com to collect your prize!
I am hoping to work on another tutorial this weekend to share on Monday or Tuesday but I am learning with two little ones things don’t always go according to the plan so we shall see if I actually get it done or not!
I hope you all have a wonderful weekend!


Just love your darling photos! That moss covered initial is beautiful. The step by step instructions are great too. I'll have to try this one, thanks for the terrific post.
Your girls are so sweet and beautiful! Love that you all cuddle in bed! It does make mornings more tolerable. 🙂
Love the letter! And your babies are absolutely beautiful!
I have been looking for something different to put on my front door. I think the letter idea would be perfect! Thanks
I live in France and you are an inspiration for me , your daughters are beautiful , happy to see you back .
your girls are gorgeous, and so photogenic! I wish my boys were only 1/2 as photogenic as them. They won't sit still for anything!
Meg
You are seriously giving me baby fever with these beautiful pictures of your little ones!
I love those photos of the girls, especially the last two. Completely beautiful, they stole the show from the moss tutorial you know.
great tutorial…i will have to try it! beautiful photos of the girls…LOVE the bitty baby jammies!
Ooo… I'll be on the look out for those moss sheets! Thanks for the tutorial! I always love your pictures, so gorgeous 😀
Shelley
they are beautiful and i love lillie's wild and crazy hair!
those photographs of your babies are absolutely stunning! they are beautiful…and i mean…beautiful babes! ( i enjoyed reading your brother's post. quite witty)
Pictures are adorable of your beautiful girls! And look forward to trying the latest moss covered letters.
I just recently discovered your site and have so enjoyed it, it is a favorite of mine. I love the pillow (white with gray flower) in your former guest bedroom. It's pictured on the chair and beds. Have you posted a tutorial for the pillow? I would love to make one and was hoping you had a tutorial in the past for it. Thank you and have a wonderful weekend.
Lola got big sissie's 'to die for' eyes too. They are so beautiful. I am mesmerized by the pictures of your girls. My baby is grown up and married so I am patiently (sort of) waiting for grand babies. I just love your blog and your beautiful home.
Your sweet babies are so beautiful! What a great easy idea for a tutorial!
Going to make a "G" for our front entry I think 🙂
Your little girls are pure sweetness. Beautiful photos. Your moss letter turned out really nice. I like how big that one is!
Thank you so much for the tutorial. I just adore your style. I was raving to my sister about your blog and she took a peek and said…"Oh, of course you love it. It's exactly your style!"…except that you are much better at doing it then myself. 😉 LOVE the snuggle pics. Just precious. The first pic of your daughter standing outside just took my breath away. It looks like she's catching lighning bugs at twilight on the east coast. Love it. Love from http://tomseth.blogspot.com/2011/04/par-tay.html
Wonderful tutorial !! And, what beautiful baby girls … truly blessed !! xo
Yea! I can't believe I won!! Thanks Jennifer!
Your pictures, as always, are beautiful!
These pictures warm my heart. Two beautiful baby girls, what a blessing! Enjoy and savour this time! Your adoring readers will understand if you aren't able to post as often as usual (although we'll miss you!) Rest up and try and get some sleep.
xoxo
B
Your moss letter is great and your girls are just darling! How nice that you have a mom who sews special little garments for your little ones.
I followed your tutorial on making the ruffled lampshade and it turned out very well. Thank you so much for the tutorial. I love my lampshade!
Hugs, cindy
Love this letter. My five year old baby girl just came over and saw the letter and said, "Mama, we just HAVE to make one of those!" I guess we'll just HAVE to. 😛 Have a great weekend! Marissa
Great tutorial! Loving the moss letter. The whole room is gorgeous just like the rest of your home (: Hope you're having a wonderful weekend!
ps. Jason's post was quite funny!
Love this tutorial!! I can't wait to make one!! These pics are darling and absolutely beautiful!! Hope all is going well and looking forward to more tutorials and of course sweet pics of the little angels!
Hugs,
Terrell
Thanks for the tutorial. I love it and… your little girls are just precious.
ohhhh Jenni. These pictures are GORGEOUS!!!! I love seeing them together. I think Lillie's hair looks adorable all full and loose!
And I am still dying to make one of those moss letters but…..where's the time?
GORGEOUS PICTURES!! I like Lillie's hair natural, because it really captures the moment! I also think I will be making one of those moss letters this summer!
Loving your blog & your babies are so cute!!
http://miss-hippy-chick.blogspot.com/
Thank You for the tutorial and your babies are adorable..
Janet
Your girls are adorable! Love your moss letter and am hoping to make one soon…thanks for the tutorial! ~Deb~
LOVE the moss covered letter – thanks for the tutorial! And your girls are just gorgeous!
Thank you for this tutorial! I have seen a handful of them in the blogosphere, but yours is by far the best! My mom and I were just out shopping for wooden letters to cover with moss and weren't having much luck, so hooray for cardboard-brilliant!
Your girls are so beautiful! You are going to be in trouble when they are older… 😉
Your girls are just darling!!
WOW! Your daughters are the most beautiful children I have ever seen. GORGEOUS! And I am still PRAYING daily hugs!
Thanks for the great idea for the moss monogram! I just made one last night for my daughter's room. This is a quirky question, but… did you have any issues with the smell of the moss? Mine smells a little funky- probably the preservatives they use on the moss. Thinking of spraying it w/ febreeze or hairspray to help solve the problem… any suggestions?
Love this tutorial! Now I must find the sheet moss…..almost ready to hop in the car and scour Hobby Lobby, Michael's, JoAnn's, etc……maybe Garden Ridge! Where did you locate yours? Gas is high…maybe you could save me a buck or 20?
Blessings to you and yours….your daughters are breathtaking….
Rhonda– Found mine at Michael's- $6.99. 🙂
So nice!!
I just love all of ur wonderful and inspiring ideas! Wher did u find the darling teal tutu with cream flower on Lillie? Also love the lighting in the pic! Where do u get ur photographing ideas?
Shelleysue – Thanks so much! The tutu is our Arabelle Tutu, which we will be offering again sometime this spring on our shop (http://www.dearlillie.com/)
Love the pics of the girls, our 3rd child, 2nd girl will arrive in Feb and I would love a sister pic like this- thanks for the idea….and I Love the crazy hair- I actually thought it beautiful. Where or who made her pajamas with the bows on the front? my daughter would love some.
Jessica – Congratulations! My husband got the PJ's at the American Girl store in Indianapolis last summer, but I'm pretty sure they sell them online too.
Your blog is amazing! Love your style. The pics of the girls are precious! I have just started a blog and have a lot to learn, but I am loving it.
I have a wire "B" in my kitchen and have been thinking about a large one for the front door. Thanks for the idea and how to! Congrats, you have 2 beautiful children!
Featured this project on my site today, great idea!
http://www.craftingrebellion.com
Love this tut! Thanks a million… Question for you…
Where on Earth did you get that sheet of moss? I have been looking everywhere for one! Help please!!!
-Kristin in VA Beach-
I think I got it at Michael's! (If I remember correctly!) =)